For a while now, I have been thinking about building my own lightbox, but I never took the time to do so. Moreover, I prefer to use the natural light as much as possible and I had no problems with that during summer time. I even took some pictures outside whenever I could.
But now, the gorgeous summer light is over, autumn is here and winter is approaching. So, my natural window light will become more and more difficult to catch. Recently, I read this article How To Build a Beginners Small Lightbox for Food Photography by Shauna from The Best Blog Recipes and it really inspired me to finally build my own lightbox. Thank you Shauna! :)
However, I don’t have enough space to store the lightbox as she did it, so I decided to make my own foldable lightbox. Moreover, I didn’t want to bother and paint a cardboard box, so I have decided to use a white foam board instead. I already had it at home, so that was an easy choice.

What you need
- 1 white foam board for the lightbox
- 1 white foam board for the reflector/upper closing
- white piece of paper
- white fabric (muslin) or tracing paper
- 3 clothing clips
- 2 bright spotlights
- tape
- cutter, scissors
- silver car sun shield (optional)
Supplies I used
How to make it
Step1
You need to measure the foam board and decide how big your lightbox is going to be. I wanted to make it big enough to be able to use colored cardboards that you can purchase at Dollarama. Therefore I have measured a rectangle of 78x60cm/31x24inches.
 Step2
Step2
Once you have your foam board rectangle ready, draw a line with your pencil in the place, where you want the foam board to fold. For me it was 31cm/12inches from one border side. Then, use your cutter to cut this line, but just make a groove, do not cut it entirely. This way, the foam board can be folded easily.


Step3
Prepare 2 frames. First, cut stripes from the remaining parts of the foam board. You will need 4 short and 4 long. The dimensions of my short stripes were: 31x4cm/12×1.5inches and for the long ones: 38x4cm/15×1.5inches. Make 2 frames by fixing all the parts together using a transparent tape.

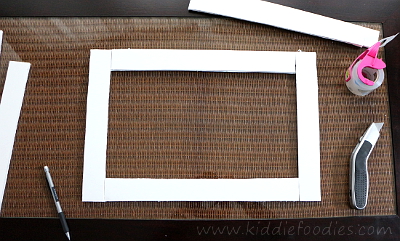
Step4
Place the frame made in Step3 on the foam board and fix with the transparent tape on the outside. Open it, place a thin stripe of paper, then use a tape to fix it.


When both frames are fixed, it should look like this:

Step5
Use a fabric (the best is muslin) or a tracing paper to cover the frames, the light from your spotlights will shine through them. I used a fabric from an old bed sheet and it was perfect. Make sure you leave enough of it to put it underneath the foam board base, so it holds together. You can fix it using laundry clips.

Step6
When the box is ready you can insert a colored cardboard. Use a clip to hold it to the foam board wall and the 2 laundry clips will hold it at the bottom.


Step7
Place two lights on each side of your lightbox. They should be bright and give natural light. I used a working lights that we had already at home and they worked pretty well. I left the box opened to be able to make photos from the above. I have used another foam board to be able to close the lighbox if needed. I made it double-sided – I fixed a car sun shield to make a reflector on one side and left it white on the other side. By doing so, I can now play with different settings. You could also add another frame with a fabric or tracing paper to be able to light the objects from the above.


Step8
When the photos are done, the lightbox can be folded flat and stored without taking too much space.

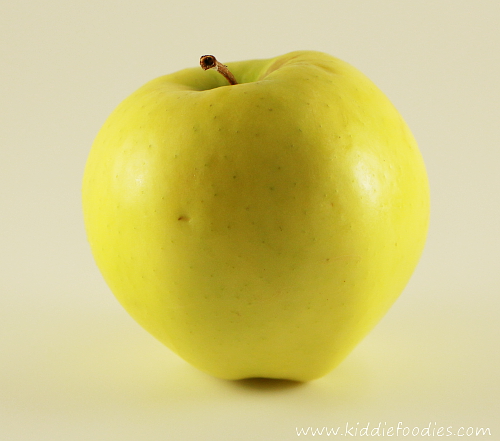
My first test done with this lightbox – a simple photo of an apple. So, what do you think, was it worth the effort? :)
How to build a foldable lightbox to improve your food photography


